Data driven VSTS4DBP unit tests

Unit testing a database deployment with DBpro can be very valuable. You can always assess whether the new deployment of the database objects has break existing code or functionality. Also, it can be used as a proof that specific database objects have been properly deployed.

Why data driven DB unit test

One of the caveat that can arise when building database unit tests is that the result value of a specific test may be hard coded into it. Let's say that one of the tests verify that an existing contact exists in the contact table.image

As shown in the picture above, you have to supply a value for the "@ManagerID" parameter. For now, its value is 0. The unit test verify that a resultset is returned by the stored procedure. So, for a specific "@ManagerID", one or more rows shoud be found in the database and returned by the stored procedure.

image

Now if we need to test several manager's IDs, we might then need to create as many unit tests as necessary. Or, we might have to open the unit test and change the "@ManagerID" parameter's value. This is not an efficient way to unit test our uspGetManagerEmployees stored procedure. By using data driven unit testing, a single test is created and get reused for every contact that you want to test.


Create necessary tables

The basis of data driven unit test is that for a specific test (or bunch of tests within the same test project), a table or data source is available. For the test created above, I created a schema called ADBTest and a specific table for it that I called ManagerEmployees.

image

This table contains the following data:

image

Column Description
ManagerEmployeeID Primary key of the table.
ManagerID Column that will be used as a parameter (@ManagerID) the store procedure dbo.uspGetManagerEmployees.
ManagerFirstName Column that will be used in the unit test to better describe the row being tested in the test result.
ManagerLastName Column that will be used in the unit test to better describe the row being tested in the test result.
EmployeeRowCount Column that will be used for the row count unit test.


Unit test data properties

In order to bind a specific test to the ADBTest.ManagerEmployees table, we need to initialize several properties of each unit tests. In order to to it, we use the testview window in visual studio:

image

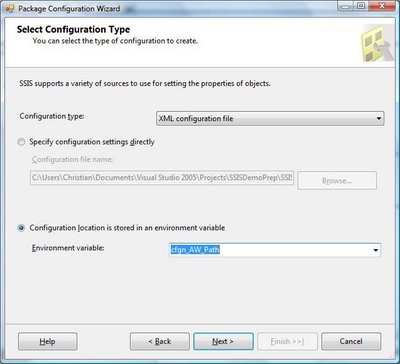
In the properties windows, we then select data connection string:

image

The data source wizard appears:

image

By selecting "Database" the following screen appears:

image

Here, I select the database where my table is located. Then, o the next screen, I choose ADBTest.ManagerEmployees table:

image

When the "Finish" button is pressed, the test properties windows looks like this:

image

Unit test code modifications

Bow that the tables where resides the unit test data is selected, we need to make slight modifications to the unit test code. By right-clicking our unit test in the solution explorer and select "VIew code", the code of the unit test class appears. The following modifications have to be made for the row count test:

public void dbo_uspGetManagerEmployeesRowCnt()
       {
           DatabaseTestActions testActions = this.dbo_uspGetManagerEmployeesRowCntData;
           // Execute the pre-test script
           //

          //Set the rowcount condition with the database value
           RowCountCondition cond1 =
           (RowCountCondition)testActions.TestAction.Conditions[0];
           cond1.RowCount =
           Convert.ToInt32(TestContext.DataRow["EmployeeRowCount"].ToString());
           //Set the manager parameter
           DbParameter p = this.ExecutionContext.Provider.CreateParameter();
           p.Direction = ParameterDirection.Input;
           p.ParameterName = "@ManagerID";
           p.Value = TestContext.DataRow["ManagerID"];
           System.Diagnostics.Trace.WriteLine("Row count test for : " + TestContext.DataRow["ManagerFirstName"] + " " + TestContext.DataRow["ManagerLastName"]);

The first thing we need to do is to create a condition for our test: cond1. This variable will hold the row count value that we want to compare with the test execution row count:

           RowCountCondition cond1 =
           (RowCountCondition)testActions.TestAction.Conditions[0];

Then, we initialize it with the EmployeeRowCount value found in the ADBTest,ManagerEmployees table:

           cond1.RowCount =
           Convert.ToInt32(TestContext.DataRow["EmployeeRowCount"].ToString());

Nest, we define a parameter: p. It will contain the parameter name as well as the manager ID:

DbParameter p = this.ExecutionContext.Provider.CreateParameter(); 
p.Direction = ParameterDirection.Input; 
p.ParameterName = "@ManagerID"; 
p.Value = TestContext.DataRow["ManagerID"];

Then,we tell the unit test class to output a line telling us which "@ManagerID" has been tested:

System.Diagnostics.Trace.WriteLine("Test for @ManagerID: " + p.Value + " (" + TestContext.DataRow["ManagerFirstName"] + " " + TestContext.DataRow["ManagerLastName"] + ")");

This way, we can see the following information in the test results window:

image

This tells us that the stored procedure parameter (@ManagerID) used was 158, which is the ID of Dylan Miller. This line of code enable the unit test to document itself.


The last code modification we need to make is to modify the test's execution line:

ExecutionResult[] testResults = TestService.Execute(this.ExecutionContext, this.PrivilegedContext, testActions.TestAction,p);

The parameter p has been added at the end of the command line.

With these small changes, our unit test can now execute as many time as there are data in our ADBTest.ManagerEmployee table!

Test designer modifications

The last changes we need to make to properly run the unit test is to comment out (or remove) the following code in the test designer:

image

As you can see in the image above, the @ManagerID as been commented out in both declaration and initialization lines. If we do not comment or remove designer<s references to the variable, the test would fail complaining that the variable is declared twice.

Running the data driven unit test

Now, we can execute the DUT. We can launch it directly from the designer or by using Visual Studio Test View to run only this unit test if you have created many in the same project.


Summary

This article demonstrated how Visual Studio for Database Professional unit tests can be driven by a data source. Doing this can add tremendous flexibility to your database deployment.

Speaking at DevTeach/SQLTeach on December 3rd

I will do a presentation on Visual Studio for Database Professional at Montreal DevTeach/SQLTeach. The focus will be on the various way we can achieve the deployment of database using VSTS4DBP a.k.a. Datadude.


Also, there is a great offer for DevTeach/SQLTeach attendees. They will all receive a  free copy of Visual Studio 2008 professional, Web ExpressionTM 2 and Tech-Ed DVD. This bundle of software has a retail value of about 1000$. So, considering this, the cost to attend at DevTeach/SQLTeach is pretty cheap for three days of great presentations!

Don't miss it!

Devteach web site

VSTS4DBP deployment using MSBuild

Deploying a database project to multiple environments can be challenging. Especially when all target machines are not equal; that is, their files are not stored in the same folder, the various database or server objects differ.

Visual Studio provides essential features that makes deployment works like a breeze: configurations and MSBuild.

One configuration for each environment (DEV, Test, Production)

By using Visual Studio configuration manager, you can define specific configurations for your solution. Simply right-click on your solution and select "Configuration manager" from the contextual menu.

Once Configuration Manager is displayed, you can see that two default configurations are created:
– Debug: this is the default configuration
– Release: this configuration is (or can be) used for deployment of VS projects

Configurations used for database deployment may be different than those used for software deployment. Simply create as configurations as necessary. For example, in my solutions, I always a configuration named "Development" for my own machine, "Test" for test server and "Production" for the production server.

<Add configuration manager picture>

image

Once configurations are defined, we can set my DBPro project accordingly.

Some files contain project's properties. They are located just below the project:

image

If we bring the project's properties screen (right-click project and select properties), we can create or update files as needed by the selected configuration. A properties file can be used by several configurations.
for different server and database objects. 

Name Description Project's properties usage
Database.sqlcmdvars Contains SQLCMD variables. Deploy tab
Database.sqldeployment Contains deployment specific parameters like whether or not the database should always be re-created, if we want the database to be backed-up before deployment, etc. Deploy tab
Database.sqlpermissions Contains specific Grant or Deny options on database objects.
Database.sqlsettings Contains information's on database settings like database collation, recovery model, etc. Project settings tab

Deploying the project

MSBuild enables us to deploy the project by using the command line. To be able to use MSBuild easily, open the visual studio command prompt from the start menu–> Visual Studio 2008:

image

Here is a common syntax that can be used to deploy a database project:

MsBuild <database project> /t:Build

So, the resulting command line is:

MsBuild DB_ETL_DEMO.dbproj /t:Build

image

Now the project has beeen built. A DB_ETL_DEMO.dbschema file has been created. We can now deploy the dbschema file to our target database. The command line syntax is:

MsBuild DB_ETL_DEMO.dbproj /t:Deploy /p:Configuration="Test"
image

The file db_etl_demo.sql is now created in the test folder of my project:

image

Find out more MSBuild command line options

Refer to "An Overview of Database Build and Deployment" in DBPro documentation. It contain lots of sample to use MSBuild in conjunction with DBPro.

Summary

This article demonstrated how a database project can be deployed using Visual Studio configurations and MSBuild command line. MSBuild is installed by Visual Studio and is very convenient when DBPro projects have to be deployed to servers or machine where the database does not have similar setup. Also, since this is a command line tool, it can be wrapped into a scheduled task in order to automate database deployment at specific intervals. In another article, I will talk about TFSBuild, the build feature that comes with Team Foundation Server.

Labels:

VSDBCMD.exe part 2

Recently, I blogged about the new VSTS4DBP 2008 GDR command line utility. In this post, I will dig into the "how to use" the utility.

Prerequisites

To be able to use the utility, we need to copy some files to a folder:
C:\Program Files\Microsoft Visual Studio 9.0\VSTSDB\Deploy:
– VSDBCMD.exe
– DatabaseSchemaProviders.Extension.xml
– Microsoft.Data.Schema.dll
– Microsoft.Data.Schema.ScriptDom.dll
– Microsoft.Data.Schema.ScriptDom.Sql.dll
– Microsoft.Data.Sql.dll
– Microsoft.SqlServer.BatchParser.dll

C:\Program Files\Microsoft SqlServer Compact Edition\V3.5:
– Sqlceer35en.dll
– Sqlcecme35.dll
– Sqlceqp35.dll
– Sqlcecs35.dll 

C:\Program Files\Microsoft Sql Server Compact Edition\V3.5\Desktop:
– System.Data.SqlServerCe.dll

These files can be copied on the target machine or a thumb drive. They must be in the same folder in order to properly use VSDBCMD. In my directory, I created a folder “ImportedSchemas”. It will contain all my .dbschema files:image

Reverse engineer an existing database

Before we reverse engineer our target database, we will make some changes to its structure. Let's rename the FirstName column to First_Name in Staging.Stg_Customers table.

image

The VSDBCMD term for database reverse engineer is import. So, the option we use at command line is /a:Import.
image

This command generate a file called ImportedSchemas\MyTarget.dbschma. This the offline representation of the target database on the machine where the VSDBCMD utility has been executed:image
Now, using this file, we are able to compare it with our database project. We simply call the schema compare tool from the data menu and set the screen as this:
image

After the schema comparison, we get the following result:
image

The comparison tells that the target database Stg_Customers differ by one column; exactly the one we changed before generating our MyTarget.dbschema file!

Deploying our database project

Database project can be deployed using VSDBCMD by using two similar command line option.

  • Generate a script that can be reviewed before executing it against the target database. This gives us a .SQL file that can be specidically named using the /DeploymentScriptFile option. To generate the script we use the /deploy option:
    image 
  • Generate a script and directly deploy the target database. This gives us a script that can be version controlled and immediatly deployed to the database. To do it, we use the /deploy and /dd option:
    image

Summary

This article demonstrated how the new VSDBCMD utility can be used to import or deploy a database. It is very useful when you want to compare a database against your database (DBPro) project or deploy it without using Visual Studio.

VSDBCMD.exe

The new GDR for Visual Studio Team System for Database Professional (VSTSDBP) now includes a command line utility. You can now generate a schema files from the source db or deploy dbschemas to target db whitout VSTS4DBP. In fact, the utility can be used by simply copying the executable and a bunch of assemblies to a thumb drive.
It gives us the following possibilities:
– reverse engineer a database on a server or
distant machine and bring the result file
(.dbschema) file with us. This way, we can
copy the dbschema file to a machine that
has VSTS4DBP and analyze it by doing
schema comparisony or static code analysis
on it.
– bring the dbschema file to another server or
distant machine in order to deploy it.
In summary, VSDBCMD.exe gives VSTS4DBP users a very useful portable
utility. In a future post, I will dig a bit more on how it can be used. I will show some samples and screen captures in order to better demonstrate what the tool can do.
Stay tuned!

Visual Studio Team System for Database Professional

I began using this tool last year and I fell in love with it almost instantly. Briefly, this tool allows you to:

  • Script your SQL Server database and put scripts under source control. This is useful when you to know precisely which version of a specific database object (table, stored procedure, etc.) was deployed with version n of an application.
  • Manage databases in the same tool (Visual Studio) that you use to develop your applications.
  • Deploy the database (either completely or incrementally) to specific servers from Visual Studio. You can also use build your database project, which produce a SQL file, and send it to DBA for deployment.
  • You can have pre and post deployment scripts that permits specific actions ( create logins, assign DB roles, insert medatada into static tables, etc.). These scripts are embedded into the final SQL script for deployment.
  • Generate data for testing purpose. With power tools installed, get specific data from another database or server in order to give developer valid data for development.
  • Generate unit tests for stored procedures. Combined with data generator, you could deploy a database and test  its stored procedures immediately.
  • The project is known as the truth version of the database.  It's very helpful when you want to deploy the database on other environments or servers. You do not have to rely on production database, reverse engineer objects in order to have the right version.

I will blog more on it in future posts. So, if you are interested, stay tuned! 😉

Labels:

Indirect VS Direct configuration

Recently, I blogged about Indirect configuration with SSIS. In the first SSIS project I did, I questioned myself, search through web sites, to find out whether I should use direct instead of indirect configuration. Here are the pros and cons of direct and indirect configurations.

Direct configuration

Pros:

  • Doesn't need  environment variables creation or maintenance
  • Scale well when multiple databases (e.g. TEST and Pre-Prod) are used on the same server
  • Changes can be made to the configurations files (.dtsconfig) when deployment is made using SSIS deployment utility

Cons:

  • Need to specify configuration file that we want to use when the package is triggered with DTExec (/conf switch).
  • If multiple layers of packages are used (parent/child packages), need to transfer configured values from the parent to the child package using parent packages variables which can be tricky (if one parent variable is missing, the rest of the parent package configs (parameters) will not be transferred).
  • The two above cons can be bypassed by using SSIS deployment wizard, so if the configuration file switch (/conf) with DTExec is not used, packages need to be deployed via SSIS configuration wizard

Indirect configuration

Pros:

  • All packages can reference the configuration file(s) via environment variable
  • Packages can be deployed simply using copy/paste or xcopy, no need to mess with SSIS deployment utility
  • Packages or application is not dependent of configuration switches when triggered with DTExec utility (command line is much simpler)
  • Multiple layers (parent/child levels) scale better since all packages has all configuration values it needs to execute. They do not depend on parent packages and a child package can be used as a parent packages without problems (no need to remove or add parent packages configurations

Cons:

  • Require environment variables to be created
  • Does not support easily multiple databases (e.g. TEST and Pre-Prod) to be used on the same server

Using multiple package set on the same server

While this is not current, it happens sometime that the same server is used for both Test and Pre-Production. Using indirect configuration, An environment variable holds the reference to a configuration file. Since there are multiple databases or package set on the same server, indirect configuration cannot be used with system environment variables.

This problem can be circumvented by using user environment variables, but this is more complicated since it requires more than one user to be created to be able to launch loads. Also, remote desktop if often used to enable developers to connect onto test/pre-prod servers for debugging or deployment purposes using their active directory (AD) account. This approach would require multiplying AD accounts by the number of databases on the server.

Another approach would be to isolate databases by using virtual machines. But, with high volume ET loads, adding another layer between OS and package set can fool performance and tuning statistics and therefore strategies used to improve overall load performance. That said, having a slower machine while testing force developers to improve their packages loading performances, which cannot be harmful when deployment of the application onto production server :-).

Which method should you use?

The answer to this question is: it depends. If you are confident that you are going to use the same path to store your configurations files in Dev/Test/Pre-prod and production servers, direct configuration is an option.

The most flexible approach is definitively the indirect configuration. Using this method, you can change configuration file location and even its name. Also, I like having my packages behave like business objects: that is they the necessary logic to access what they need to function properly. A package know where to look to find out its core configurations (connection strings for example). It does not rely on parent package for them.

I hope this article help some of you decide which configuration method to use. On all the projects I did ( or doing), I always need to think of which method to use. It always depend on the architecture and deployment method used in place. But, when I have the choice (nothing has ever been done yet), indirect configuration is my first choice.

Using indirect configuration with SSIS

SSIS has a great feature called indirect configuration. It is used to store the configuration access path into the computer’s environment variable. This feature greatly facilitates the deployment of an SSIS solution. All you have to do is to set the environment variable on the target computer and all packages in the solution automatically points to the right place.

Configurations are at the very heart of SSIS packages. They are used to set specific properties to packages objects. 5 configuration types are available within an SSIS package:

  1. XML configuration file: an XML file (.dtsconfig) is created in the folder you specify.
  2. Environment Variable: The property of the package object is set to the value of the chosen environment variable.
  3. Registry Entry: The property of the package object is set to the value from a registry.
  4. Parent package variable: Used to pass parameters from a parent package variable child package object property.
  5. SQL Server Used to initialize a package objects property from a SQL Server configuration table (this will be explained in a subsequent post).

All of these configuration types, except one, have another option button at the bottom of the package configuration wizard window “Configuration location is stored in an environment variable”। This enable to refer to the configuration file(।dtsconfig), registry entry, parent package variable or SQL Server table connection string using the value of an environment variable. The only exception in the list is the Environment variable configuration: since we already specify that the package property object is set via an environment variable, it is then already using indirect configuration.

A
practical example on using indirect configurations
The best way to demonstrate the indirect configuration usage is to build an example। Start business intelligence development studio (bids) and choose “Integration Services Project” from the New project templates। Give a name to the project and if rename “Package.dtsx” in the solution explorer to “Indirect configuration example”. Click “Yes” when asked to rename the package object as well. The last action causes the package name to be renamed as well as the package file name.

Next, create a connection manager: in the connection manager’s window at the bottom of the package window, right-click into it and choose “New OleDB connection”. Click New, the connection manager window appears
:

Choose your server from the “Server name” combo box. Make sure that “Use Windows Authentication” radio button is selected then choose “AdventureWorks” database from the “Select or enter a database name” combo box. Click then on “Test Connection” and a message box appears confirming that the test connection succeeded. Rename the new connection manager “cmgr_AdventureWorks”. The prefix is part of a naming convention I use. Having a naming convention is very useful because it helps to categorize different package’s objects and it makes it easier to parse a log file when, for example, a load is running or has crashed.

On the control flow of a package, select SSIS in the menu bar then choose “Package configurations”. The package configuration appears. Check the checkbox “Enable package configuration” then, click “Add” at the bottom of the window. The “Package Configuration Wizard” window appears

From the “Select Configuration Type” page, choose “XML configuration file”. Type cfgn_AdventureWorks in the “Configuration file name” textbox. Click on the “browse” and then the “Save” buttons. This will create a XML configuration file named cfgn_AdventureWorks.dtsConfig in the project’s folder. Click on the “Next” button.

The next wizard’s page “Select Properties to Export” enables us to export (store) multiple properties values into the configuration file. Since we only want to set the connection string of our connection manager, in the treeview at left, expand Connection managers, cmgr_AdventureWorks, Properties then check ConnectionString property. Click on the “Next” button. Give a name to your new configuration: cfgn_AdventureWorks then click on the “Finish” button.

Browse to your project folder and double-click on the file named “cfgn_AdventureWorks.dtsConfig. Your file should look like this:

Some information’s specific to my computer and SQL Server instance will be different in your file.

Using indirect configuration
Ok, now we have a DIRECT configuration. Our package references the full path of our configuration file. That’s not exactly what we want since once our package will be deployed, it's more than likely that the configuration file will be in the same location (drive, folder, etc.). To circumvent this behavior, we need to make our package to get its connection information (the configuration we just created) in a more generic way: we are going to use an environment variables – we are going to have an INDIRECT configuration.

First of all, we need to create an environment variable. But you need to be aware that our new environment variable won't be visible for our SSIS package or project if BIDS is opened before we create the variable. So, if BIDS is opened, close it.

There are two type of environment variables:

  • System: these variables are available to all users that log on the computer.
  • User: these variables, as the name of the type implies, are available to the user that create them and log on the computer.

SSIS is able to see both types. It is just easier to use system environment variables since all users can use them. Especially on a server. Several process could use it.

Also, there are several ways to create environment variables. My favorite way is using the "Setx" command line.If your operating system is Windows XP, you will have to download Windows XP SP2 Support Tools  Then, at command prompt, type:

Setx cfgn_AW_Path C:\MyProjectFolder\cfgn_AW_Path.dtsConfig -m

The -m option will make the environment variable "System". Now, open another command prompt window and type :

set cfgn_AW

Your screen should look like this:

Now, start up BIDS again and open your project. Open your package, right-click in the control flow and select "Package Configurations" from the popup menu. Now Edit your configuration that we've created earlier. Select the “Configuration location is stored in an environment variable” and then choose the cfgn_AW_Path environment variable.

Click "Next" and "Finish" and voila, your package reference your dtsx configuration file via an environment variable.

This article showed you how to use indirect package configuration. By using this type of configuration, you can change the location of your configuration files and even rename them. All of this will be transparent to your packages.

Labels:

Blog at WordPress.com.

Up ↑